'App startup time' 요약
안드로이드 개발자 문서의 App startup time (https://developer.android.com/topic/performance/vitals/launch-time) 페이지 내용 요약입니다.
![]()
0. 요약 정리
0.1 프로파일링
- “Displayed|Fully drawn” 으로 logcat 확인
- Android Studio의 Profiler의 “Start this recording on startup” 기능 활용해서 method sampling
- 직접 Trace 할 부분 지정해 놓고, Perfferto 로 확인
0.2 주요 해결책
- 별도의 쓰레드 사용 (Running Android tasks in background threads)
- 뷰 계층 간소화
- Hilt 사용
- App Startup library 사용
- 스플래시 스크린 사용
1. Understand app-start internals
앱 런치는 세 가지 종류가 있습니다. Cold는 맨 땅에서 시작하는 것이고, 나머지 둘은 백그라운드에서 돌고 있는 앱을 foreground로 가져옵니다.
최적화 작업은 cold start 상황을 염두하고 진행하세요. cold start를 최적화하면, warm/hot start도 빨라집니다.
1.1 Cold start
부팅 후 첫 실행이거나, kill 된 후 처음으로 실행하는 경우입니다.
cold start가 시작되면, 시스템은 아래 3가시 task를 수행합니다.
- Loading and launching the app.
- Displaying a blank starting window for the app immediately after launch
- Creating app process
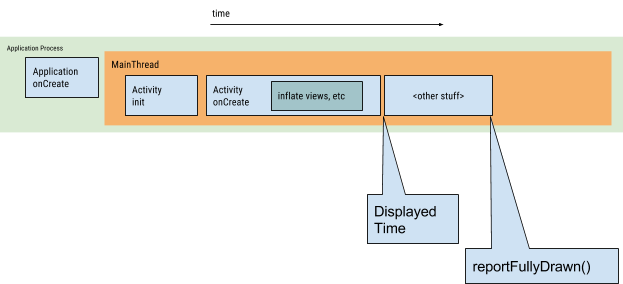
앱 프로세스는 다음 단계를 실행합니다.
- Creating the app object
- Launching the main thread
- Creating the main activity
- Inflating views
- Laying out the screen.
- Performing the initial draw.
앱이 첫 draw를 완료하면, 시스템은 현재 표시되고 있는 background window를 main activity로 swap 합니다. 이 때부터 유저가 앱을 사용할 수 있습니다.
성능 이슈는 app 생성과 activity 생성때 발생할 수 있습니다.
🔷 Application creation
Application.onCreate()를 override 했을 경우, 시스템이 해당 onCreate()를 호출합니다. 그 후에, 앱이 main thread(UI thread)를 생성하고, 이 스레드를 통해 main activity를 만듭니다.
이 때부터, app lifecycle stages에 따라 진행됩니다.
🔷 Activity creation
앱 프로세스가 activity를 만들어지면, activity는 다음 동작을 수행합니다.
- Initializes values.
- Calls constructors.
- Calls the callback method, such as Activity.onCreate()
보통, 요 onCreate() 에서 오버헤드가 높은 작업(loading and inflating views, and initializing objects 등)을 수행하므로, load time에 가장 큰 영향을 미치는 부분입니다.
1.2 Hot start
activity가 아직 메모리에 있는 상태라서, foreground로 가져오기만 하면 되는 경우입니다.
1.3 Warm start
hot start는 아닌데, cold start의 일부만 하면 되는 경우
- 앱에서 나왔다가 re-launch
- 시스템이 앱을 메모리에서 제거했는데, 유저가 re-launch한 경우. process와 activity는 재시작해야 하지만 saved instance state bundle 이 onCreate()에서 활용됨
2. Detect and diagnose problems
2.1 Android vitals
다음과 같은 경우에 시작 시간이 너무 긴것으로 간주하고, 리포트 해줌
- cold start 5초 이상
- warm start 2초 이상
- hot start 1.5초 이상
2.2 Diagnosing slow startup times
🔷 Time to initial display
“Displayed” 로 logcat을 필터링하면, 맨 처음 그릴 때까지의 시간 출력됨
아래 내용들이 포함됨
- Launch the process.
- Initialize the objects.
- Create and initialize the activity.
- Inflate the layout.
- Draw your application for the first time.
logcat 예시
ActivityManager: Displayed com.android.myexample/.StartupTiming: +3s534ms
adb로 실행해서 시간 측정
adb [-d|-e|-s <serialNumber>] shell am start -S -W
com.example.app/.MainActivity
-c android.intent.category.LAUNCHER
-a android.intent.action.MAIN
Starting: Intent
Activity: com.example.app/.MainActivity
ThisTime: 2044
TotalTime: 2044
WaitTime: 2054
Complete
🔷 Time to full display
lazy loading을 하는 상황에서도 의미 있는 시간을 측정하기 위해서, reportFullyDrawn() 을 호출해 주면 됩니다.
아래와 같이 Fully drawn 로그를 출력해 줍니다.
system_process I/ActivityManager: Fully drawn {package}/.MainActivity: +1s54ms
🔷 Identifying bottlenecks
아래 도구를 활용하세요.
- Android Studio의 CPU Profiler
- Perffeto
3. Be aware of common issues
3.1 Heavy app initialization
🔷 해결책
lazy initialization Hilt 같은 dependency injection framework 사용 (처음 inject될 때, 객체들과 디펜던시들 생성) App Startup library 사용
3.2 Heavy activity initialization
🔷 주요 이슈들
- Inflating large or complex layouts.
- Blocking screen drawing on disk, or network I/O.
- Loading and decoding bitmaps.
- Rasterizing
[VectorDrawable](https://developer.android.com/reference/android/graphics/drawable/VectorDrawable)objects. - Initialization of other subsystems of the activity.
🔷 해결책
- 뷰 계층 구조 간소화
- ViewStub 객체 활용 (UI중 시작할 때 표시할 필요가 없는 부분은 나중에)
- 다른 쓰레드 활용
3.3 Themed launch screens
Themed launch screen 을 사용해서, 좀 더 부드럽게 보여질 수 있음
Material Design patterns 를 따르는 것을 추천함.
Activity에 windowBackground theme attribute를 지정하면, 스플래시 이미지를 지정할 수 있음.
참고: https://velog.io/@pish11010/Android-Splash-Screen-구현
splash.xml (drawable)
<layer-list xmlns:android="http://schemas.android.com/apk/res/android" android:opacity="opaque">
  <!-- The background color, preferably the same as your normal theme -->
  <item android:drawable="@android:color/white"/>
  <!-- Your product logo - 144dp color version of your app icon -->
  <item>
    <bitmap
      android:src="@drawable/product_logo_144dp"
      android:gravity="center"/>
  </item>
</layer-list>
theme.xml
<style name="SplashTheme" parent="Theme.AppCompat.NoActionBar">
    <item name="android:windowBackground">@drawable/splash</item>
  </style>
manifest
<activity ...
android:theme="@style/SplashTheme" />
Activity
class MyMainActivity : AppCompatActivity() {

    override fun onCreate(savedInstanceState: Bundle?) {
        // Make sure this is before calling super.onCreate
        setTheme(R.style.Theme_MyApp)
        super.onCreate(savedInstanceState)
        // ...
    }
}